If you’re looking to upgrade or troubleshoot your computer’s graphics processing unit (GPU), it’s essential to know how to remove the GPU from the motherboard safely. Whether you’re swapping out for a more powerful card or addressing technical issues, this guide will walk you through the steps. Properly handling this process is crucial to avoid damage to both the GPU and the motherboard.
Follow these instructions to seamlessly remove the GPU from the motherboard, ensuring a smooth transition for your computer’s graphical capabilities. Now, let’s delve into the detailed steps on how to remove the GPU from the motherboard.
Table of Contents
Precautions Before Removing Your Graphics Card from Motherboard
You must take the following safety measures before beginning the GPU removal process:
- Power Down and Unplug: Before attempting to remove the GPU, power down your computer and disconnect it from the electrical outlet. This ensures a safe environment for handling sensitive components.
- Switch Off Your PCU: Turn off the Power Supply Unit (PCU) to cut off the power completely. This step is crucial to prevent any electrical current from running through the system, reducing the risk of damage during the removal process.
- Do Not Do Anything Forcefully: Exercise patience and gentleness when handling the GPU. Avoid applying excessive force, as this can lead to damage or bending of the components. Carefully follow the manufacturer’s guidelines for your specific GPU model.
- Antistatic Precautions: Ground yourself by using an antistatic wrist strap or by touching a grounded metal object before handling the GPU. Static electricity can damage sensitive electronic components, so take precautions to discharge any built-up static charge.
- Check for Additional Power Connections: Some GPUs may have additional power connectors. Ensure that you’ve disconnected any power cables attached to the GPU before attempting to remove it. This helps prevent accidental damage and ensures a smoother extraction process.
Now step by step to removing Your Graphics Card from the Motherboard
Removing your graphics card from the motherboard is a straightforward process, but it requires precision and care to prevent any damage. Here’s a step-by-step guide to safely detach your GPU:
Step 1: Access the Interior
- Begin by removing the screws securing the side panel of your PC case. This will grant you access to the internal components.
Step 2: Locate Your Graphics Card
- Identify your graphics card on the motherboard; it typically resides in the PCIe x16 slot. Consult your motherboard specifications if you’re having trouble locating it.
Step 3: Disconnect PCIe Cable
- Press down on the clip of the PCIe cable connected to the graphics card. While pressing the clip, gently pull the cable to disconnect it from your GPU.
Step 4: Remove Holding Screws
- Utilize a Phillips screwdriver to remove the screws that secure your GPU to the PCIe slots on the back of your PC. Ensure all screws are loosened before proceeding.
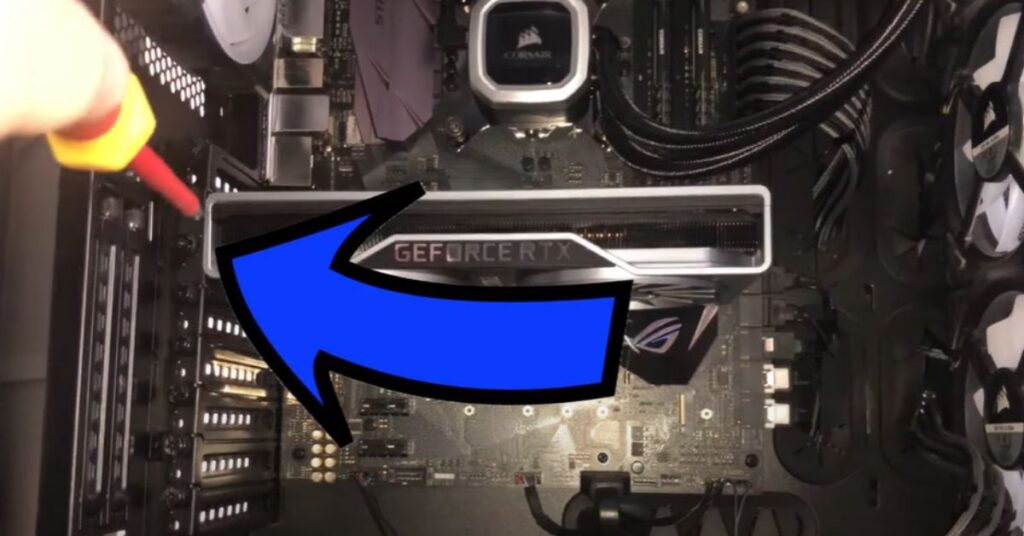
Step 5: Release and Remove GPU
- Press down the latch, a small retention clip, located on the PCIe slot. Simultaneously, carefully pull up the GPU while maintaining pressure on the latch with your other hand.
Note:
- Avoid pulling the graphics card without pressing the latch, as it may result in damage to your motherboard or GPU. Exercise caution and follow these steps diligently to ensure a smooth and risk-free removal process.
Conclusion
Concluding the process of removing your graphics card from the motherboard requires emphasizing the importance of diligence and precision. By following the outlined steps with care, you safeguard both your GPU and motherboard from potential damage. Remember to power down, disconnect, and take anti-static precautions before initiating the removal.
Whether you’re upgrading or troubleshooting, this guide empowers you to handle the task confidently. As you successfully detach your graphics card, you pave the way for future upgrades or maintenance with the assurance that your components remain intact. Keep this guide handy for reference, ensuring a seamless and risk-free experience whenever the need arises to remove or replace your GPU.
Frequently ask question
Can I remove the graphics card without turning off the computer?
No, it’s crucial to power down your computer and disconnect it from the electrical outlet before attempting to remove the graphics card. This ensures safety and prevents potential damage.
Why is it necessary to remove the PCIe cable carefully?
The PCIe cable is connected to the graphics card via a clip. Pulling it without releasing the clip may damage the connector or the motherboard. Carefully press down on the clip while gently pulling the cable to disconnect it.
Do I need any special tools to remove the graphics card?
The primary tool required is a Phillips screwdriver to remove the screws holding the GPU in place. Additionally, consider an antistatic wrist strap to prevent static discharge.
What if I can’t find my graphics card on the motherboard?
Consult your motherboard specifications to locate the PCIe x16 slot where the graphics card is typically installed. If needed, refer to the user manual for detailed instructions.