Embarking on a PC-building journey and wondering, How to install expansion slots? Fear not! Installing expansion slots is a breeze. Simply locate the motherboard, gently insert the card into the designated slot, secure it, and voila – you’ve expanded your PC’s capabilities. Transform your rig into a powerhouse with this easy, step-by-step guide!
Table of Contents
How important of expansion slots in your computer?
Expansion slots are crucial for enhancing and customizing your computer’s capabilities. They allow you to add extra hardware, like graphics cards or network adapters, adapting your system to specific needs, improve performance, and keeping your computer up-to-date with evolving technologies.
Further reading: How Does Its Expansion Slot Work?
Before Installing expansion slots What to know?
Before diving into the exciting world of installing expansion cards and upgrading your computer, here are some key things to know:
- Identify Your Needs: Understand why you want to install an expansion card. Is it for better graphics, enhanced audio, or improved networking? Knowing your needs helps you choose the right type of expansion card.
- Check Compatibility: Not all expansion cards fit all computers. Ensure that the card you’re considering is compatible with your motherboard and that you have the right type of slot for it.
- Know Your Slots: Different expansion cards require different slots. PCI, PCIe, and other slot types have unique characteristics. Make sure the slot matches the card. For example, a graphics card might need a PCIe x16 slot.
- Consider Power Requirements: Some high-performance cards, especially graphics cards, may need additional power beyond what the motherboard provides. Check if your power supply unit (PSU) can handle it.
- Physical Space: Check if you have enough physical space inside your computer case. Some cards, especially those with large heatsinks or fans, might require extra room.
- Remove Power: Before opening your computer case and touching anything inside, power down your computer completely and unplug it from the electrical outlet. This ensures safety during the installation process.
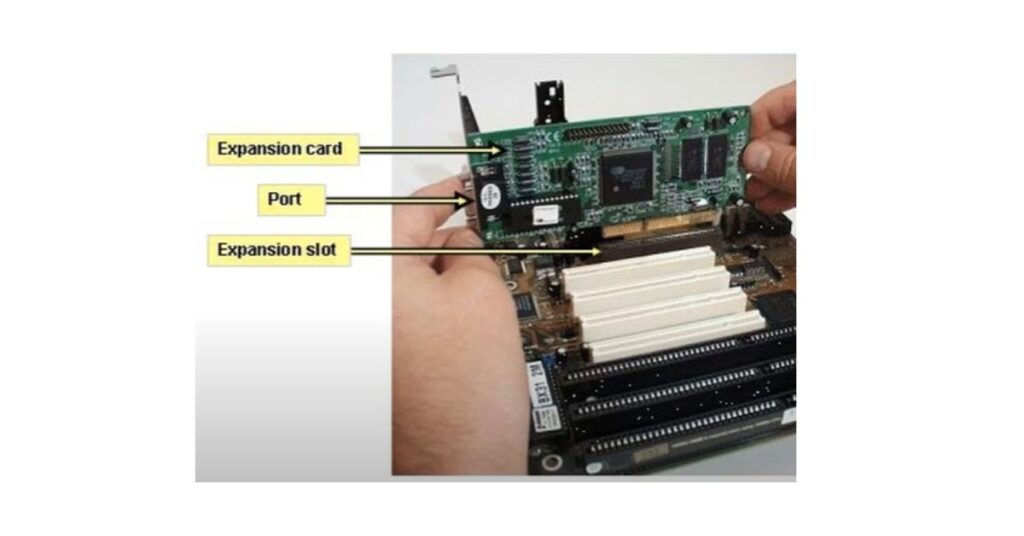
- Locate the Expansion Slot: Find the right expansion slot on your motherboard. They are typically located near the back and are catty-corner to the RAM slots. Remove any covers or brackets that might be blocking the slot.
- Antistatic Precautions: To prevent damaging sensitive electronic components, ground yourself by touching a metal part of the computer case before handling any expansion cards.
- Read the Manual: Always consult the motherboard’s manual for specific instructions regarding expansion slots. It provides valuable information on compatible cards, installation steps, and potential issues.
- Install Necessary Drivers: Some expansion cards require drivers for proper functionality. Ensure you have the latest drivers ready to install after physically installing the card.
Remember, a little preparation goes a long way in ensuring a smooth installation process and avoiding potential issues.
How to install expansion slots?
Installing an expansion card is like giving your computer a new superpower. Here’s a step-by-step guide to installing an expansion card:
1. Power Down
- Turn off your computer completely.
- Unplug the power cord from the electrical outlet to ensure safety.
2. Ground Yourself
- Touch a metal part of the computer case to discharge any static electricity from your body. This helps prevent damage to sensitive components.
3. Identify the Slot
- Locate the appropriate expansion slot on your motherboard. These slots are usually near the back of the case and may be catty-corner to the RAM slots.
4. Remove Cover:
- If there is a metal bracket covering the expansion slot on the back of the computer case, remove it. This is where the ports of the expansion card will be accessible.
5. Align the Card
- Carefully align the edge connector of the expansion card with the slot on the motherboard. Ensure it matches the type of slot you’re using (e.g., PCIe x16).
6. Seat the Card
- Gently but firmly press down on the top edge of the card until it’s fully seated in the slot. You might hear a click as it locks into place.
7. Secure the Card
- If there’s a screw or latch to secure the card in place, use it. This helps prevent the card from accidentally coming loose.
8. Replace Cover
- If you removed a metal bracket, put it back in place and secure it with screws. This maintains the integrity of your computer case.
9. Close the Case
- Carefully close the computer case and secure it with any screws or latches.
10. Power On
- Reconnect the power cord to the electrical outlet.
- Turn on your computer.
11. Install Drivers
- After your computer boots up, install any necessary drivers for the expansion card. You can usually find these on a CD that came with the card or download them from the manufacturer’s website.
12. Test the Card
- Ensure the computer recognizes the new hardware. Test the functionality of the expansion card to make sure everything is working as expected.
And there you have it – you’ve successfully installed an expansion card on your computer! Remember to refer to your motherboard’s manual and the documentation that came with the expansion card for any specific instructions.
Troubleshooting Tips
Common Installation Issues and Solutions:
1. Card Not Recognized
- Issue: Your computer doesn’t recognize the new card.
- Solution:
- Recheck the card’s seating in the slot.
- Confirm compatibility between the card and motherboard.
- Install or update drivers for the card.
2. No Display or Poor Graphics
- Issue: If installing a graphics card, you encounter no display or poor graphics quality.
- Solution:
- Check power connections to the graphics card.
- Verify the card’s compatibility with your monitor and cables.
- Ensure the card is fully seated in the slot.
3. Device Manager Errors
- Issue: Errors in the Device Manager related to the new card.
- Solution:
- Uninstall the card from Device Manager.
- Reinstall the drivers and restart your computer.
- Ensure drivers are up-to-date.
4. System Instability or Crashes
- Issue: Your system becomes unstable or crashes after installing the new card.
- Solution:
- Confirm the power supply can handle the new card’s requirements.
- Check for conflicts with existing hardware.
- Ensure the motherboard BIOS is up-to-date.
5. Inadequate Performance
- Issue: The new card isn’t performing as expected.
- Solution:
- Ensure you have the latest drivers installed.
- Check if the card is operating at the correct speed (e.g., x16 for PCIe).
- Verify that the card meets your performance expectations.
Resources for Further Assistance
1. Manufacturer’s Support
- Visit the official website of the expansion card’s manufacturer.
- Check for FAQs, forums, or support sections for troubleshooting guides.
2. Motherboard Manual
- Refer to your motherboard’s manual for specific guidance on expansion slots.
- Check for any BIOS updates that might address compatibility issues.
3. Online Communities
- Participate in online tech communities such as Reddit, Stack Exchange, or specialized forums.
- Seek advice from experienced users who may have encountered similar issues.
4. Tech Support Forums
- Visit tech support forums provided by your computer’s manufacturer.
- Post detailed descriptions of the issue for community assistance.
5. Professional Help
- If all else fails, consider seeking professional help.
- Contact your computer manufacturer’s support or consult with a local technician.
Thoroughly research and understand the issue before attempting solutions. If unsure, seek guidance from knowledgeable sources to avoid potential complications.
Final words
Finally, to install expansion slots, all you have to do is turn off the computer, ground yourself, locate the appropriate slot, align and firmly seat the expansion card, tighten the slot, and power on the computer. After the actual installation, don’t forget to verify compatibility, take safety precautions, and install any required drivers. Common problems might require troubleshooting, and for additional support, resources like online forums, manufacturer support, and expert assistance can be helpful.